Send images to AWS S3
In this how-to guide we configure a camera to send images to Amazon S3. We start with building and deploying the AWS Serverless Application Model (AWS SAM), and then continue with configuring the camera.
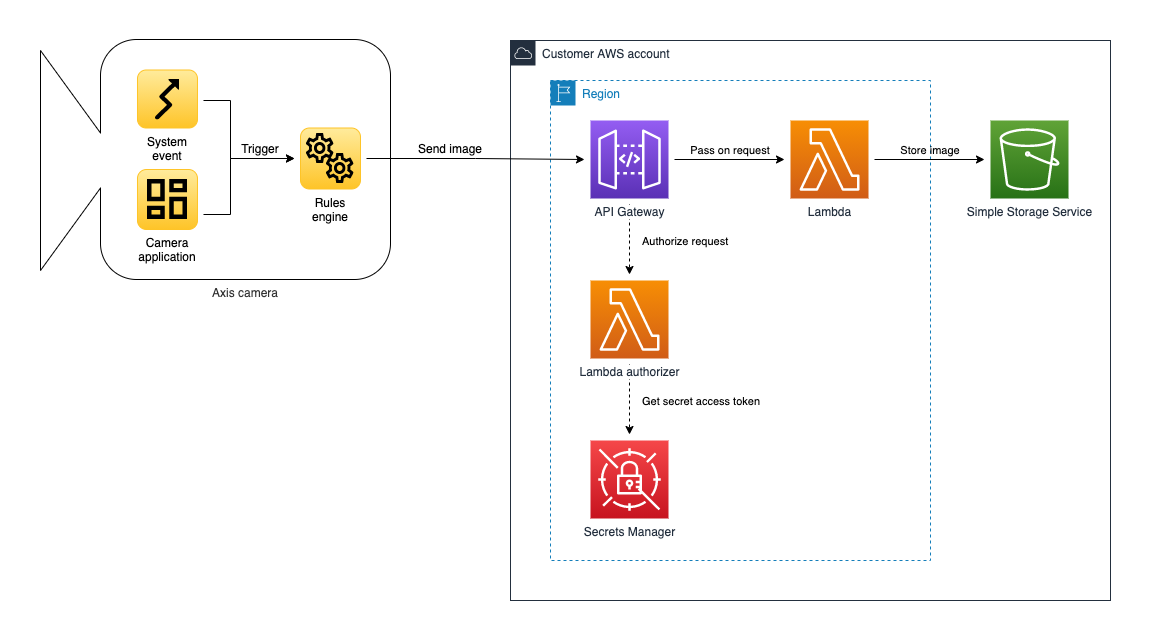
The application consists of the following AWS resources.
- API Gateway
- API Gateway Lambda authorizer
- Access token stored in Secrets Manager
- Lambda function
- S3 bucket
As the camera is not able to sign requests using AWS Signature Version 4 we need to include a Lambda function to handle this step. Rather than sending images directly from the Axis camera to AWS S3 we instead send them to an API Gateway. The API Gateway delegates authorization to a Lambda authorizer that compares the provided access token to an access token stored in Secrets Manager. If the provided access token is deemed valid the API Gateway forwards the request to a Lambda function that proceeds with uploading the provided image to an AWS S3 bucket.
Prerequisites
- A network camera from Axis Communications (how-to guide has been verified to work on a single channel camera with firmware version >=9.80)
- Git (install)
- Node.js (Install Node.js TLS)
- AWS SAM CLI (install)
To follow the procedures in this how-to guide you need a command-line interface or shell to run commands, see the command-line interface reference for more information.
Instructions
The instructions are divided into two parts. The first part covers deploying the AWS resources and the second part covers configuring the camera.
To start off, make sure to clone the repository and navigate into the example directory:
git clone https://github.com/AxisCommunications/acap-integration-examples-aws.git
cd acap-integration-examples-aws/images-to-aws-s3
Deploy the AWS resources
Let's build and deploy the AWS resources receiving the images sent from an Axis camera. The resources are described in template.yaml using AWS SAM.
To build and deploy your application for the first time, run the following commands in your shell:
sam build
sam deploy --guided
The first command will build the source of your application. The second command will package and deploy your application to AWS, with a series of prompts.
- Stack Name: The name of the CloudFormation stack. This should be unique to your account and region, and a good starting point would be
images-to-aws-s3or something similar. - AWS Region: The AWS region you want to deploy your app to.
- Confirm changes before deploy: If set to yes, any change sets will be shown to you before execution for manual review. If set to no, the AWS SAM CLI will automatically deploy application changes.
- Allow SAM CLI IAM role creation: This AWS SAM template creates AWS IAM roles required for the AWS Lambda function to access AWS services. By default, these are scoped down to minimum required permissions. Select
Yto have SAM automatically create the roles. - Save arguments to samconfig.toml: If set to
Y, your choices will be saved to a configuration file inside the project, so that in the future you can re-runsam deploywithout parameters to deploy changes to your application.
After a successful deployment navigate to your newly created AWS CloudFormation stack in the AWS Console. The stack will contain three output parameters. One is called Recipient and defines the URL of the AWS HTTP API where cameras should send their images. Another is called AccessToken and contains the URL to the secret API access token found in AWS Secrets Manager. This API access token authorizes the camera and allows it to send images. Requests to the AWS HTTP API without this access token will be denied access. Both these output parameters will be used in the next chapter where we configure the camera.
Configure the camera
Now that the resources in AWS are ready to accept images, let's continue with configuring the camera to send them.
Navigate to the camera using your preferred web browser. In the user interface of the camera, select System -> Events. In this user interface we'll do all configuration, but first let's get an overview of the available tabs.
- Rules - Here we'll create a rule that sends images to our AWS S3 bucket
- Recipients - Here we'll define where images are sent
- Schedules - In this sample we'll use a schedule to define when an image should be sent. If a schedule doesn't fit your specific use case, you can replace it with any event generated on the camera or even an event generated by any ACAP installed on the camera.
Let's start with Recipients. Select the tab and create a new recipient with the following settings.
- Name:
AWS S3 - Type:
HTTPS - URL: Back when we deployed the AWS resources using CloudFormation stacks we talked about output parameters. You'll have to get the value of the output parameter named
Recipientand enter it here.
Click the Save button.
Now let's navigate to the Schedules tab. In this sample we'll use a schedule to define when an image should be send. Create a new schedule with the following settings.
- Name:
Every minute - Type:
Pulse - Repeat every:
1 Minute
Click the Save button.
Now let's navigate to the Rules tab. Here we'll finally create a rule that combines the recipient and the schedule into a rule. Create a new rule with the following settings.
- Name:
Images to AWS S3 - Condition:
Pulse- Pulse:
Every Minute
- Pulse:
- Action:
Send images through HTTPS- Recipient:
AWS S3 - Maximum images:
1 - Custom CGI parameters: Back when we deployed the AWS resources using CloudFormation stacks we talked about output parameters. The output parameter
AccessTokenpoints to a secret in AWS Secrets Manager. Follow the link, retrieve the secret value and format it according toaccessToken=<secret value>. E.g. if the secret value isFooBarthen the value you should enter here isaccessToken=FooBar. Please note that copying the secret from AWS Secrets Manager sometimes adds a space in the beginning of the secret. Please make sure to remove this space before saving the rule.
- Recipient:
Click the Save button.
At this point the rule will become active and send an image to AWS S3 every minute.
Cleanup
To delete the deployed AWS resources, delete the CloudFormation stack either via the AWS Console or via the AWS CLI using the following command:
aws cloudformation delete-stack --stack-name <CloudFormation stack name>
Troubleshooting
This section will highlight some of the common problems one might encounter during this how-to guide.
No images are sent to AWS S3
If the camera is unable to successfully send images to AWS S3, please make sure that the following statements are true.
- The camera is not behind a proxy. This how-to guide does not support a network topology where requests needs to traverse a proxy to reach the internet.
Disclaimer
Amazon Web Services, AWS and the Powered by AWS logo are trademarks of Amazon.com, Inc. or its affiliates. All other trademarks are the property of their respective owners, and we are not affiliated with, endorsed or sponsored by them or their affiliates.
As described in this document, you may be able to connect to, access and use third party products, web sites, example code, software or services (“Third Party Services”). You acknowledge that any such connection and access to such Third Party Services are made available to you for convenience only. Axis does not endorse any Third Party Services, nor does Axis make any representations or provide any warranties whatsoever with respect to any Third Party Services, and Axis specifically disclaims any liability or obligations with regard to Third Party Services. The Third Party Services are provided to you in accordance with their respective terms and conditions, and you alone are responsible for ensuring that you (a) procure appropriate rights to access and use any such Third Party Services and (b) comply with the terms and conditions applicable to its use.