Build hard hat detection using AXIS Object Analytics and Amazon Rekognition
Hybrid machine learning refers to the use of edge computing (on-premise) for initial data processing (in this setup the Axis camera), and then sending the more compute-intensive tasks to the cloud for deeper analysis. This approach is commonly used in scenarios where you might want to reduce the amount of data sent to the cloud, manage latency, or address privacy and security concerns.
This how-to guide describes a solution that uses AXIS Object Analytics on the Axis camera to do the initial data processing, only sending images to Amazon Web Services (AWS) when people enters the scene. Pre-trained models in Amazon Rekognition assesses that the people are using personal protective equipment (PPE), such as a helmet. The inference result is sent to AXIS D4100-E Network Strobe Siren via MQTT, that either signals green to indicate that the helmet is on and red to indicate that the helmet is off.
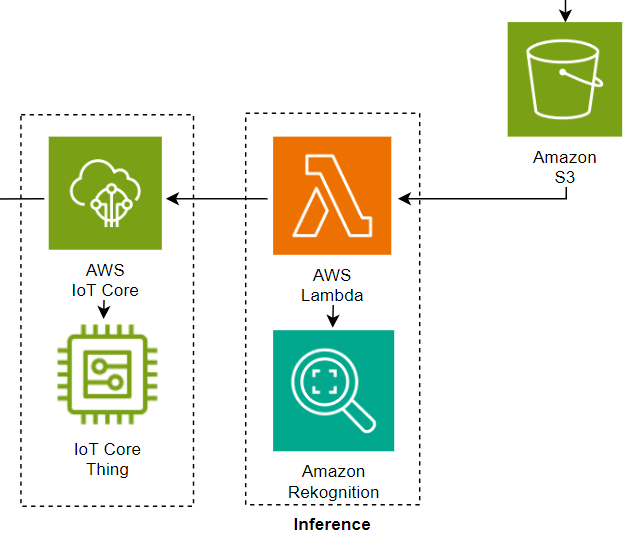
The architectural overview below shows the required components (hardware and software) and protocols to set up the solution.
You can replace some components to develop solutions for other use cases. For example, replace AXIS Object Analytics with another application to send images to AWS. Or replace the Axis strobe siren with an Axis door station to change the output and result of the solution.
Modifying the AWS Lambda function that calls the Amazon Rekognition is also possible if the use case requires other detection types.

Prerequisites
- Camera running AXIS Object Analytics - Click here to find cameras featuring the line crossing scenario.
- AXIS D4100-E Network Strobe Siren
- Access to AWS - Amazon Rekognition isn't available in all regions. For this setup to work, select one of its supported regions.
Solution setup
These are the main steps of this how-to guide:
- Camera image to Amazon Simple Storage Service (Amazon S3) bucket
- AWS IoT Core, acting as a MQTT broker
- Amazon Rekognition PPE detection (inference)
- AXIS Object Analytics (camera application) and event setup
- Strobe siren event and MQTT subscription
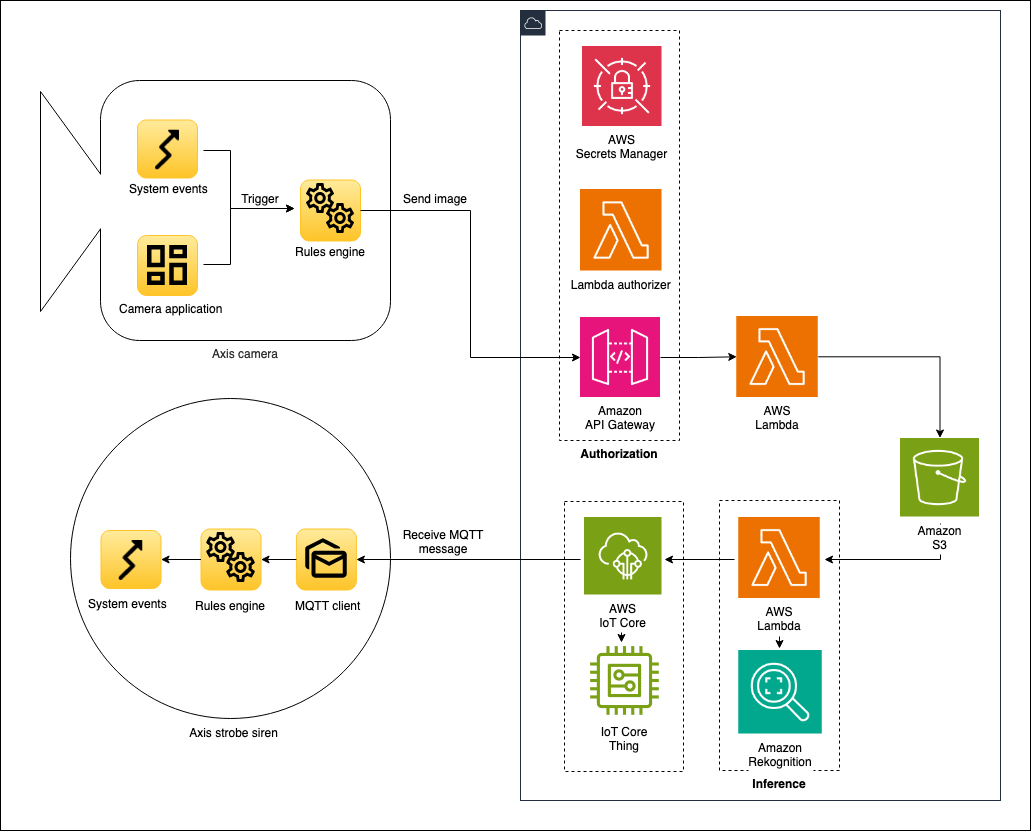
Detailed overview showing all cloud services.
Camera image to Amazon S3 bucket
The image below illustrates the upload of a camera image to an Amazon S3 bucket.
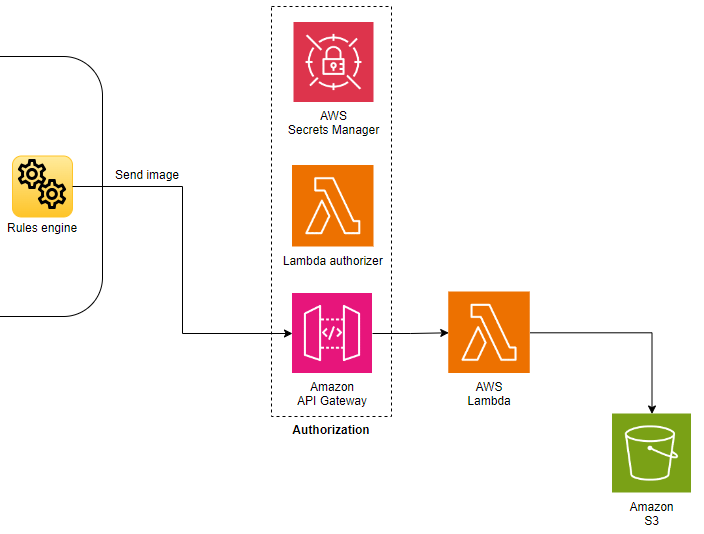
Sending images from a camera to Amazon S3 describes how to set up the Amazon S3 and the required peripheral services to handle the authentication.
Follow the instructions up until the section called Configure the camera. Keep note on the AWS CloudFormation stack output parameters named Recipient, AccessToken and Bucket as you will need them later on in this how-to guide.
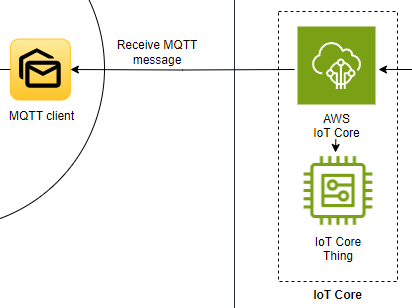
AWS IoT Core and MQTT client
In this section we'll set up AWS IoT Core and have the Axis strobe siren connect to it using its MQTT client.
Set up an AWS IoT Core thing
-
Sign in to the AWS Management Console and search for IoT Core.
-
Go to Manage > All devices > Things and click Create things.
-
Select Create single thing and click Next.
-
Enter a unique name and click Next.
-
On the Configure device certificate page, select Auto-generate a new certificate and click Next.
-
Create a new policy or attach an existing one to the certificate. You're redirected to a new page if you create a new policy. For this how-to guide, create a new policy with three statements:
-
First statement
- Policy effect:
Allow - Policy action:
iot:Connect - Policy resource:
*
- Policy effect:
-
Second statement
- Policy effect:
Allow - Policy action:
iot:Subscribe - Policy resource:
*
- Policy effect:
-
Third statement
- Policy effect:
Allow - Policy action:
iot:Receive - Policy resource:
*
warningNot restricting the policy resource is acceptable in an exploratory phase, but applying least-privilege permissions is a requirement before going to production.
- Policy effect:
-
-
Return to the previous page to attach the applicable policy and click Create thing.
-
Download the Device certificate, Public key file, Private key file and the Root CA certificate.
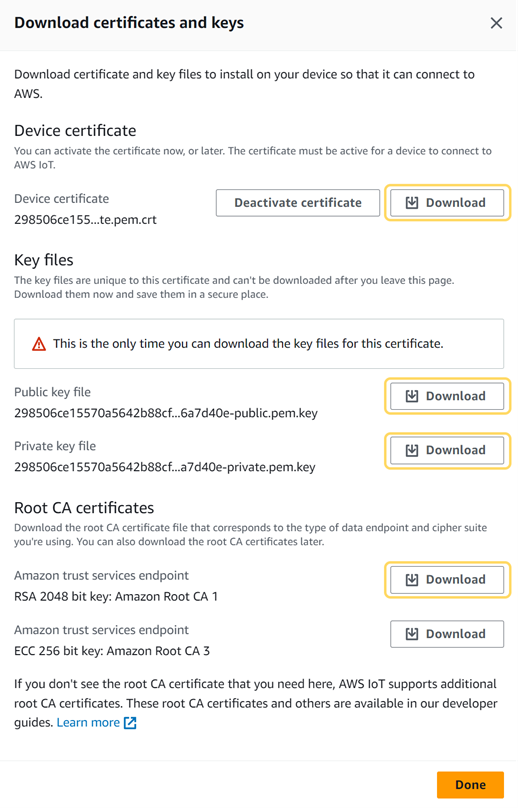
Screenshot from AWS Management Console -
Click Done.
Set up the MQTT client in the Axis strobe siren
In the Axis strobe siren, install the client and CA certificates to enable a secure MQTT connection to AWS IoT Core:
- Log in to the Axis device and go to System > Security.
- Click Add certificate.
- Select Upload a client-server certificate using a separate private key and click Next.
- Upload the client certificate (filename ends with
certificate.pem.crt) and the private key (filename ends withprivate.pem.key) and click Next. - Click Install and then Close.
- Click Add certificate again and select Upload a CA certificate.
- Upload the root CA certificate (
AmazonRootCA1.pem). - Click Next and then Install and Close.
Next, configure the device's MQTT client:
- In the Axis device go to System > MQTT.
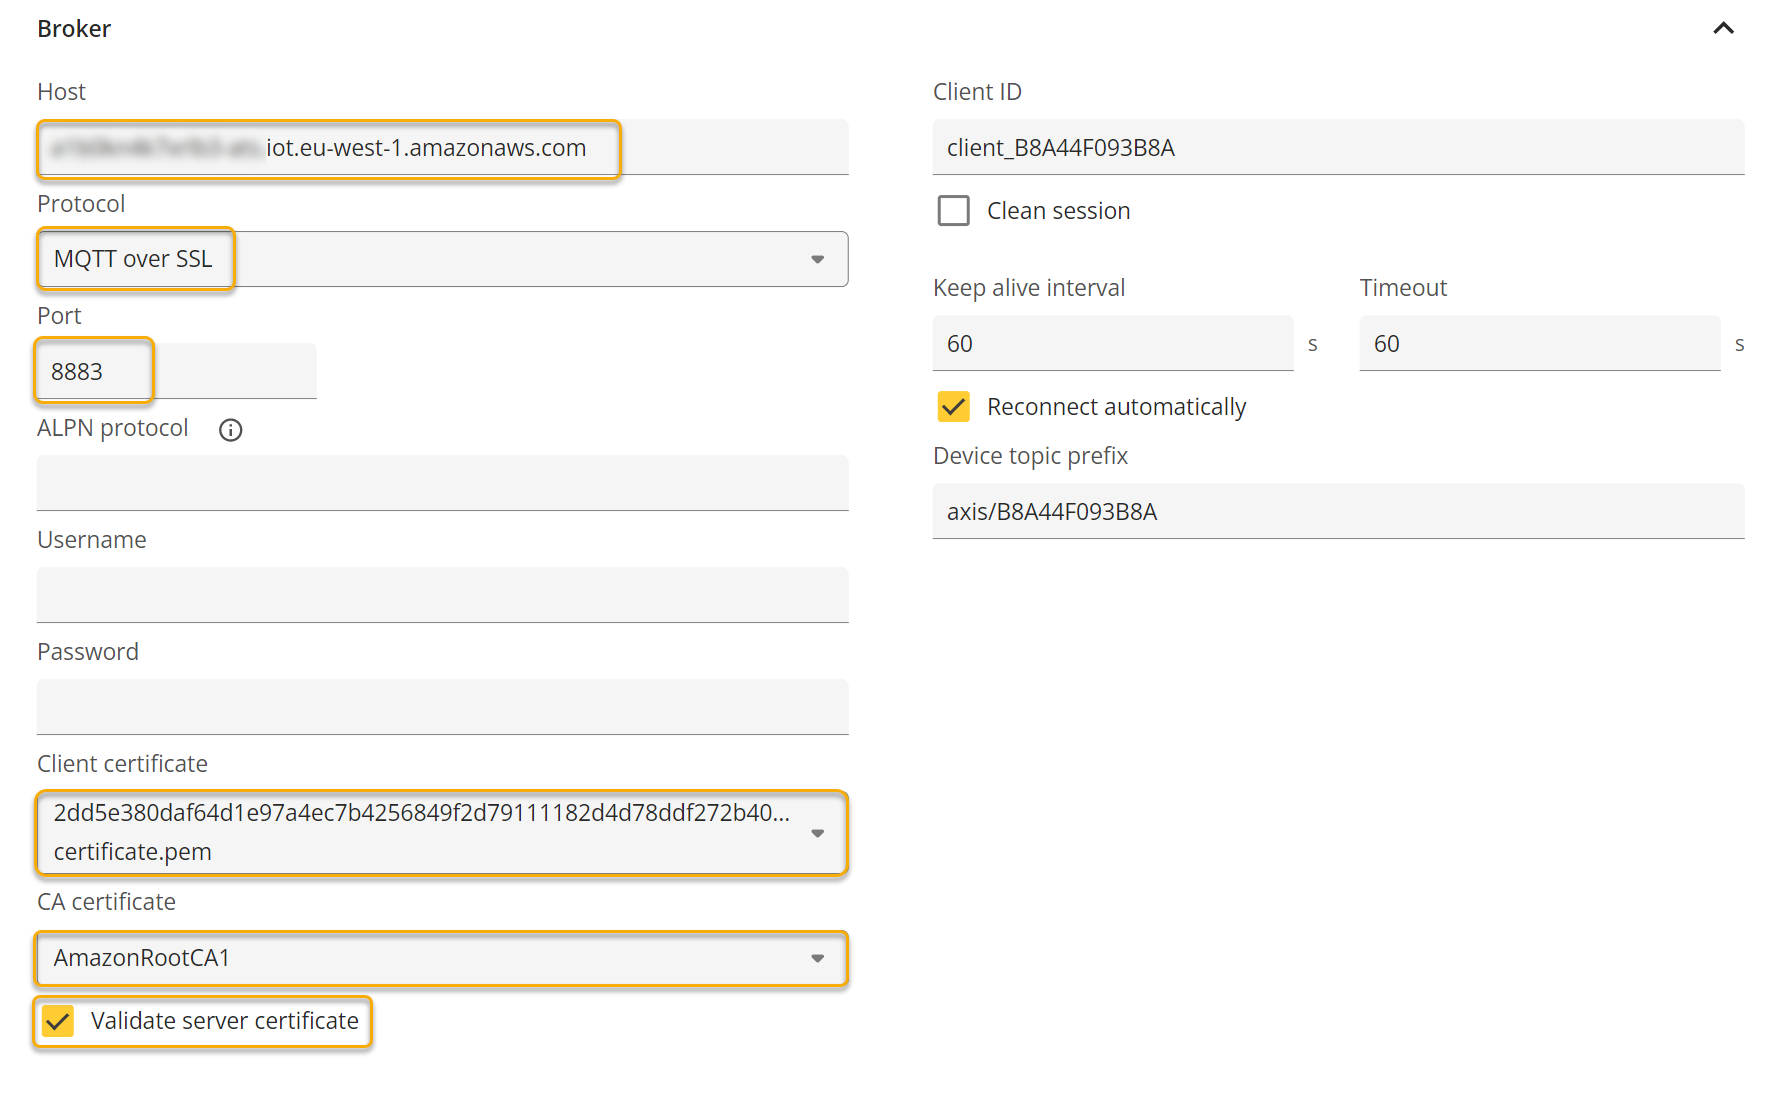
- In the Host field, enter the hostname for AWS IoT Core. You can find the hostname (device data endpoint) in the AWS Management Console under IoT Core > Settings.
- In the Protocol drop-down menu, select MQTT over SSL using the default port 8883.
- In the Client certificate field, select the previously uploaded client certificate.
- In the CA certificate field, select the previously uploaded CA certificate.
- Select Validate server certificate.
- Click Save.
- Turn on Connect.
Here's an example of an MQTT client setup in an Axis device.
Amazon Rekognition PPE detection (inference)
This section explains how to set up and configure the AWS Lambda function to grab an image from the Amazon S3 bucket, input the image to Amazon Rekognition, and transfer the detection result (helmet on or off) to AWS IoT Core.
Create an AWS Lambda function
- Sign in to the AWS Management Console and search for Lambda.
- Create a new AWS Lambda function.
- Select Author from scratch.
- Set a name for the function.
- Select Node.js as runtime.
- Select x86_64 as architecture.
- Click Create function.
Set up the AWS Lambda function
-
Add a trigger to the Amazon S3 bucket where you store the uploaded images.
-
Add the code below to the
index.mjsfile within your AWS Lambda function:index.mjsimport { RekognitionClient, DetectProtectiveEquipmentCommand } from "@aws-sdk/client-rekognition";
import { IoTDataPlaneClient, PublishCommand } from "@aws-sdk/client-iot-data-plane";
const BUCKET_NAME = process.env.BUCKET_NAME;
const IOT_CORE_DEVICE_DATA_ENDPOINT = process.env.IOT_CORE_DEVICE_DATA_ENDPOINT;
const rekognitionClient = new RekognitionClient();
const ioTDataPlaneClient = new IoTDataPlaneClient({
endpoint: `https://${IOT_CORE_DEVICE_DATA_ENDPOINT}`
});
const anyPersonWithoutProtectiveEquipment = async (objectKey) => {
const input = {
Image: {
S3Object: {
Bucket: BUCKET_NAME,
Name: objectKey
}
},
SummarizationAttributes: {
MinConfidence: 50,
RequiredEquipmentTypes: ["HEAD_COVER"]
}
};
const command = new DetectProtectiveEquipmentCommand(input);
const res = await rekognitionClient.send(command);
return res.Summary.PersonsWithoutRequiredEquipment.length > 0;
};
const publishMessage = async (alarm) => {
const input = {
topic: alarm ? "ppe/alarm/on" : "ppe/alarm/off",
payload: JSON.stringify({ message: "PPE detection payload" })
};
const command = new PublishCommand(input);
await ioTDataPlaneClient.send(command);
};
export const handler = async (event) => {
if (!event || !event.Records || event.Records.length !== 1) {
console.log(`unexpected event structure: ${JSON.stringify(event)}`);
return;
}
const objectKey = event.Records[0].s3.object.key;
console.log(`bucket: ${BUCKET_NAME}, object key: ${objectKey}`);
const alarm = await anyPersonWithoutProtectiveEquipment(objectKey);
await publishMessage(alarm);
}; -
Go to Configuration of the AWS Lambda function and set up two Environment variables. One for the bucket name and one for the AWS IoT Core endpoint.
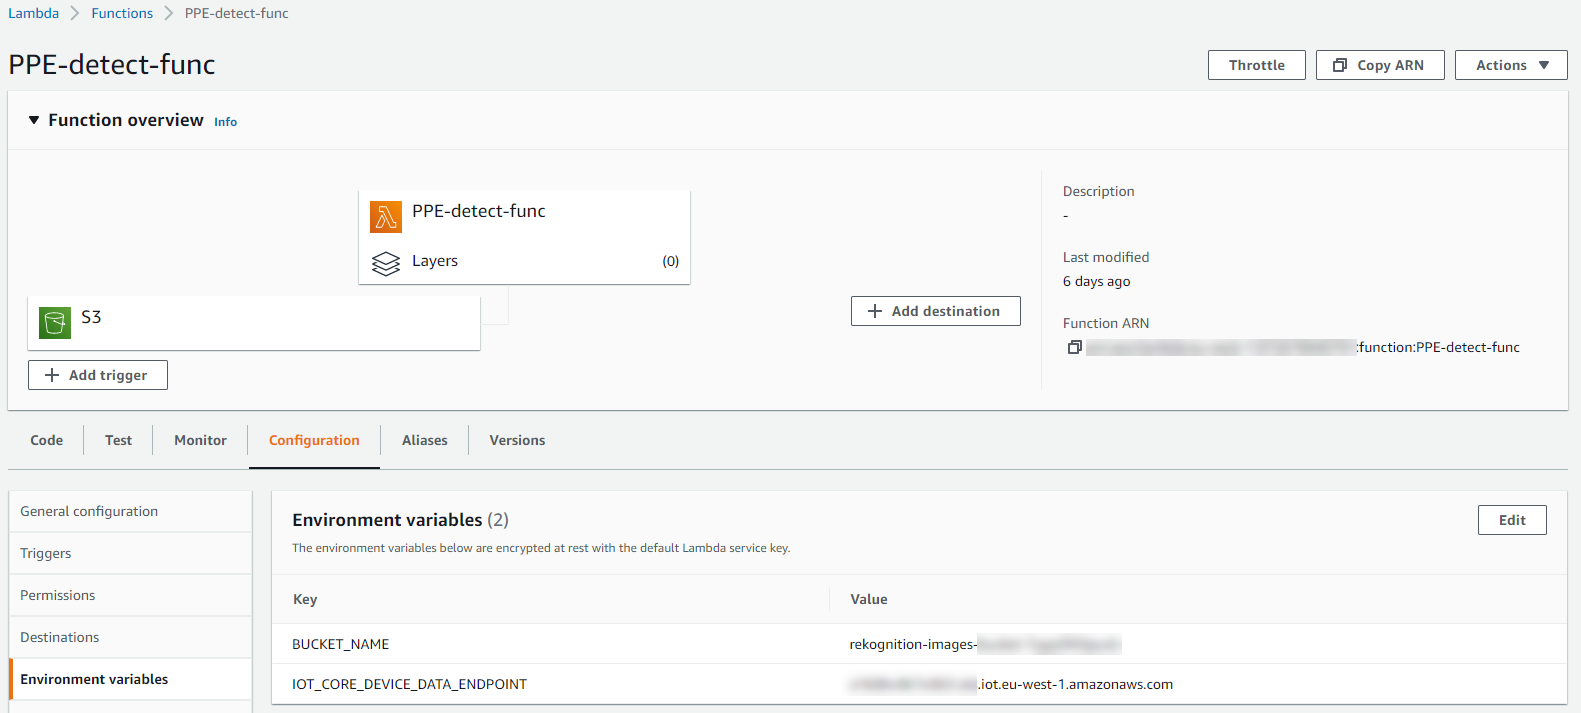
Screenshot from AWS Management Console
AWS Lambda function permissions
Finally, set up the correct permissions for the AWS Lambda function to access the Amazon S3 bucket, Amazon Rekognition and AWS IoT Core.
- Go to Configuration > Permissions and click the Role name in Execution role.
- In the IAM (Identity and Access Management) role, select Create inline policy from the Add permissions dropdown.
- Specify the following permissions and create the policy:
- Service:
S3GetObjectGetObjectVersion
- Service:
RekognitionDetectProtectiveEquipment
- Service:
IoTPublish
- Service:
- With the policy created and attached to the role, you're done configuring the AWS Lambda permissions.
AXIS Object Analytics (camera application) and event setup
Line Crossing in AXIS Object Analytics
- In the Axis camera, go to Apps and make sure that the application named
AXIS Object Analyticsis running. - Click Open to configure the application.
- Set up a line crossing scenario where you want to capture an image and send it to Amazon S3.
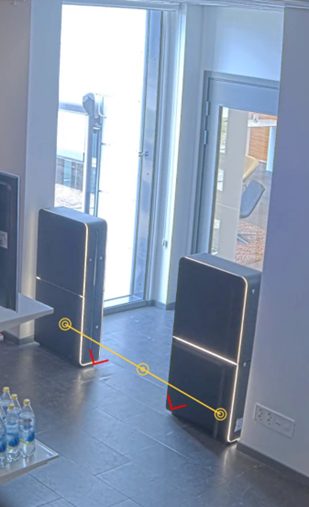
Example of a line crossing scenario in AXIS Object Analytics
Set up Axis camera event
Now it is time to set up an HTTPS recipient to the Amazon API Gateway and an event that triggers an image upload.
- In the Axis camera go to System > Events.
- On the Recipients tab click Add recipient, pointing to the Amazon API Gateway.
- Name:
AWS S3 - Type:
HTTPS - URL: The AWS CloudFormation stack output parameter named
Recipient, from back when we created the Amazon S3 bucket.
- Name:
- On the Rules tab click Add a rule with the following settings:
- Name:
AXIS Object Analytics: Line crossing - Condition: The Object Analytics scenario created in AXIS Object Analytics
- Action:
Send images through HTTPS- Recipient:
AWS S3 - Maximum images:
1 - Custom CGI parameters: The AWS CloudFormation stack output parameter named
AccessTokenpoints to a secret in AWS Secrets Manager. Follow the link, retrieve the secret value and format it according toaccessToken=<secret value>. E.g. if the secret value isFooBarthen the value you should enter here isaccessToken=FooBar. Please note that copying the secret from AWS Secrets Manager sometimes adds a space in the beginning of the secret. Please make sure to remove this space before saving the rule.
- Recipient:
- Name:
The camera will now send an image every time a person crosses the line that you created in AXIS Object Analytics.
Strobe siren event and MQTT subscription
This section explains how to set up the MQTT subscription in the Axis strobe siren and tie the MQTT topic to different events that control the strobe siren's light or sound.
Set up MQTT subscription
- In the strobe siren under System > MQTT go to MQTT subscriptions and add a new subscription, matching one of the message topics sent by the Amazon Rekognition AWS Lambda function.
- Subscription filter:
ppe/alarm/on - Use default topic prefix:
Unchecked
- Subscription filter:
- Add a second subscription, matching the other message topics sent by the Amazon Rekognition AWS Lambda function.
- Subscription filter:
ppe/alarm/off - Use default topic prefix:
Unchecked
- Subscription filter:
Set up a strobe siren profile
- In the strobe siren add a new profile, give it a name (example
green-light), and configure the desired signaling. - Create a second profile for some other color or sound (example
red-light).
Set up an event
- In the strobe siren, go to System > Events and add a rule with the following settings:
- Name:
Alarm on - Condition:
- Type:
Stateless - Subscription filter:
ppe/alarm/on - Use device topic prefix:
Unchecked
- Type:
- Action
- Type:
Run light and siren profile - Profile:
red-light - Action:
Start
- Type:
- Name:
- Add a second rule with the following settings:
- Name:
Alarm off - Condition:
- Type:
Stateless - Subscription filter:
ppe/alarm/off - Use device topic prefix:
Unchecked
- Type:
- Action
- Type:
Run light and siren profile - Profile:
green-light - Action:
Start
- Type:
- Name:
Test and validation
To test the solution, trigger the line crossing in AXIS Object Analytics. The Axis strobe siren should light up red or green, depending on whether you're wearing a helmet.
To check the MQTT messages sent to AWS IoT Core, log in to the AWS Management Console and navigate to the MQTT test client in AWS IoT Core. You can see all messages published to the broker if you subscribe using the wildcard #.
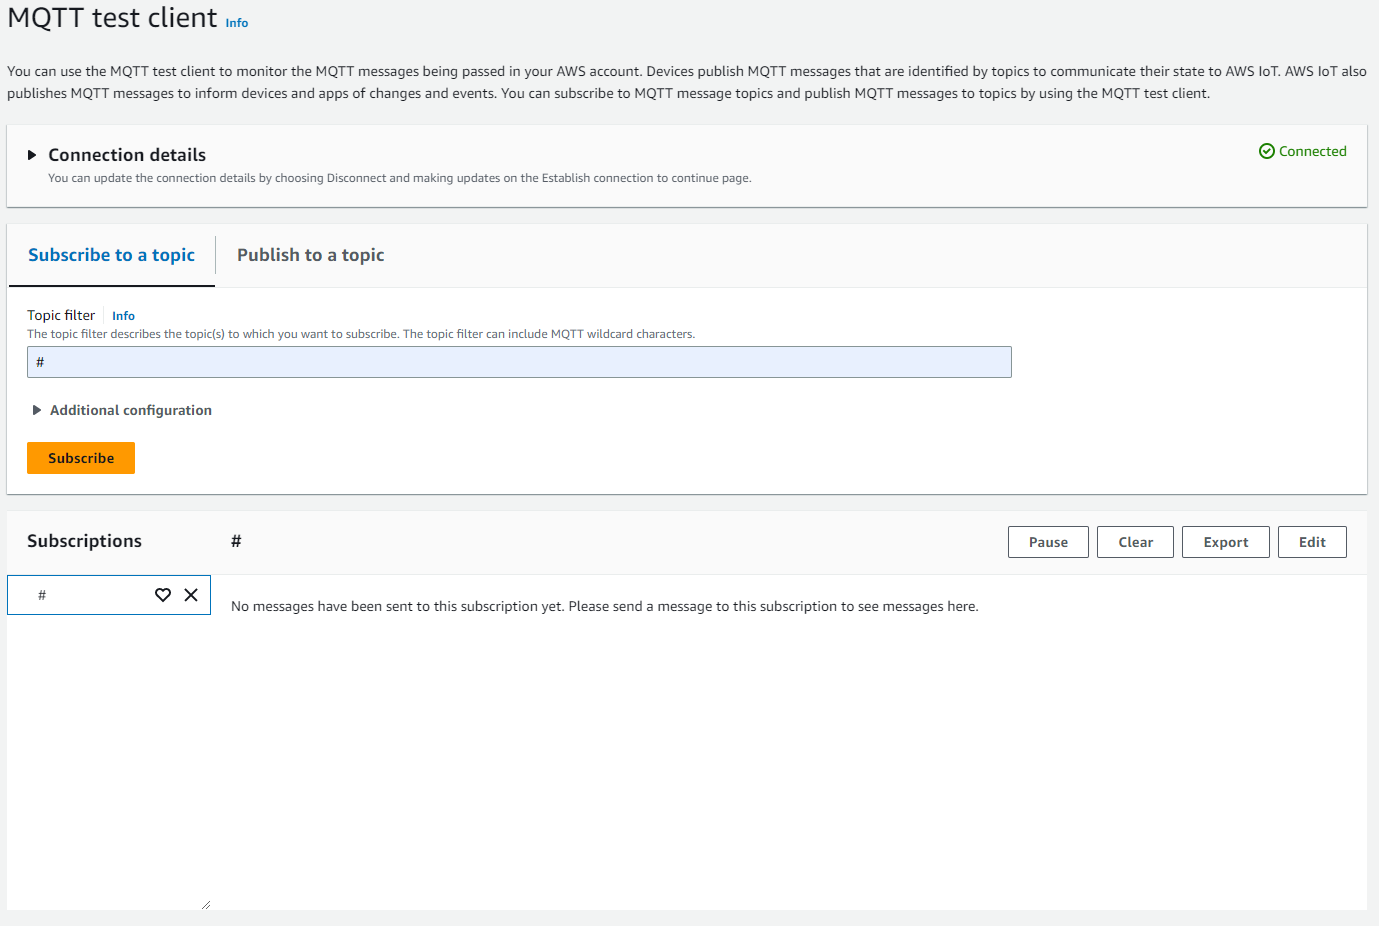
Screenshot from AWS Management Console
Disclaimer
Amazon Web Services, AWS and the Powered by AWS logo, Amazon Simple Storage Service (Amazon S3), Amazon Rekognition and AWS Lambda are trademarks of Amazon.com, Inc. or its affiliates. All other trademarks are the property of their respective owners, and we are not affiliated with, endorsed or sponsored by them or their affiliates.
As described in this document, you may be able to connect to, access and use third party products, web sites, example code, software or services (“Third Party Services”). You acknowledge that any such connection and access to such Third Party Services are made available to you for convenience only. Axis does not endorse any Third Party Services, nor does Axis make any representations or provide any warranties whatsoever with respect to any Third Party Services, and Axis specifically disclaims any liability or obligations with regard to Third Party Services. The Third Party Services are provided to you in accordance with their respective terms and conditions, and you alone are responsible for ensuring that you (a) procure appropriate rights to access and use any such Third Party Services and (b) comply with the terms and conditions applicable to its use.
PLEASE BE ADVISED THAT THIS DOCUMENT IS PROVIDED “AS IS” WITHOUT WARRANTY OF ANY KIND, AND IS NOT INTENDED TO, AND SHALL NOT, CREATE ANY LEGAL OBLIGATION FOR AXIS COMMUNICATIONS AB AND/OR ANY OF ITS AFFILIATES. THE ENTIRE RISK AS TO THE USE, RESULTS AND PERFORMANCE OF THIS DOCUMENT AND ANY THIRD PARTY SERVICES REFERENCED HEREIN IS ASSUMED BY THE USER OF THE DOCUMENT AND AXIS DISCLAIMS AND EXCLUDES, TO THE MAXIMUM EXTENT PERMITTED BY LAW, ALL WARRANTIES, WHETHER STATUTORY, EXPRESS OR IMPLIED, INCLUDING BUT NOT LIMITED TO ANY IMPLIED WARRANTIES OF MERCHANTABILITY, FITNESS FOR A PARTICULAR PURPOSE, TITLE AND NON-INFRINGEMENT AND PRODUCT LIABILITY.